TABLE OF CONTENTS
Forward
The sport of lightest touch combat (also known as boffers or light
weapons combat) and live action roleplaying has become a major part
of my life since I first made makeshift foam swords to play with my
brothers and my sister as a youth. I learned the sport and the game
in a community of people who play in what we call "The Realms of
Wonder" at live roleplaying events held in New Hampshire, Massachusetts
and Connecticut. The people I have met in The Realms have taught me
a great deal, and I have dedicated myself to bringing the sport to as
many other people as possible. To this end, I am writing down everything
I know about the sport and about the game in the hopes that it will
find its' way to bookstores, and people, across the country someday.
Since 1991, I have been editing and publishing a newsletter called
"The View from Valehaven". The View has served the Realms
community since 1989, providing its readers with event announcements,
articles, fiction, poetry and artwork about and inspired by live action
roleplaying events. My goal in publishing a manual on lightest touch
combat and live roleplaying is not to make the Realms a national or
international organization. My goal is to spread the knowledge of how
lightest touch combat can be played, and how live action roleplaying
games can be run. There is no one right or best way to play the sport
or to run a live-action roleplaying event. I hope to present an easy-to-learn
and fun way to fight and to role-play in my writings. I have attempted,
whenever possible, to make this book compatible with The Realms of Wonder.
I would like to take a moment to mention that this is a game for adults.
Children sparring should be trained and supervised by adults at all
times. I feel that when played by the rules in this booklet, Boffers
is a safe sport. That does not mean that there is no risk of injury.
The responsibility of ensuring the safety of individuals playing this
sport lies with themselves and with the individuals running the practices
or events where they are fighting.
I would also like to mention that over the years I have seen countless
children playing with plastic 'swords' that have pointed ends that would
be very easy to poke an eye out with. They are quite common, and you
can go to any toy store and buy one. Boffers are designed with flat
ends that cannot go into an eye socket very easily, especially not a
child's eye socket. When built correctly, they are much, much safer
than many toys you can buy at stores, and in my opinion, would be a
wise replacement for those ever so popular pointed plastic swords.
This manual is about lightest touch combat, the construction of light
weapons and the Marshalling of lightest touch combat. As the sport of
lightest touch combat is a major component of many live action roleplaying
games, there are references to magic, characters, "NPCs" and
other things that have to do with live action roleplaying in this booklet.
The sport of lightest touch combat can be played independently of any
roleplaying or fantasy gaming. In my opinion, it is when the two are
combined, and you are no longer sparring with an opponent, but fighting
for your 'life' out in the middle of the woods, that it is truly the
most fun and challenging.
I would like to thank my wife Amy, and my family for all their support.
I could never have done it without you. I would also like to thank the
following people for the support they have shown me: Kathy Horn, Aaron
Addison, Kathy Journeay, Shannon Slate, Tim Gilkes, Chris Ernenwein,
Jill Junkala, Mark Marciel, Phill Lamson and Jonathan Berman. Overall,
I would like to thank the entire Realms Community for the support and
guidance it have given me.
I would like to dedicate this book to my father, Norman J. E. Johnson.
If not for you, I might never have chosen this path. You have made this
possible.
- Stephen R. Johnson -
Combat & Safety Rules
One of the first things you need to know about lightest touch combat
is that no matter how safe your light weapons are, if you don't play
by the rules, people may end up getting hurt. Anytime you bring someone
new into this sport, it is your responsibility to everyone else who
may ever spar with them to train them well. This begins with making
sure that they know and understand the safety rules you are playing
by.
Different groups that participate in lightest touch combat have different
safety rules they fight by. The rules listed below were originally written
by Shannon Slate and are being used by eventholders who throw events
for the Realms of Wonder and Imagination, as printed in the 1996 Omnibus
to the Realms.
- We should all be doing this to have fun. If you get mad or uncontrolled
it is up to you to remove yourself from the fighting. A Marshal may
pull you off the field if you do not.
- You must listen to the Marshal(s) at all times (they are the referees).
- If you have any questions it is up to you to ask (most accidents
happen because some people don't have foresight).
- This is a sport of honor. Treat it as such. If you are caught cheating,
a Marshal may remove you from any combat. Remember that honor begets
honor.
- There is to be contact with weapons only (i.e. weapons hitting weapons,
weapons hitting bodies and weapons hitting shields only).
- There is no rule number 6!
- If you see a harmful or unsafe situation, yell the word "HOLD!"
(i.e. someone has an unsafe weapon, gets their glasses knocked off,
is about to fall off a cliff, etc...). It is the primary responsibility
of a person who is hurt to call a hold. Before calling a hold for
someone else in an otherwise safe situation, you must first ask them
if they are OK.
- If you hear the word "HOLD!", stop immediately! Then say
"HOLD!" until everyone else has stopped moving. Do not move
from where you are until the problem has been taken care of and the
Marshal or the person who called the hold signals play to resume by
yelling "3... 2... 1... LAY ON!!!"
- Holds should only be called in the event of a dangerous situation
and may NOT be used to discuss rules.
- There is to be NO body contact of any kind (i.e. no punching, kicking,
biting, grabbing, etc...)
- There is to be NO grabbing of an opponent's weapons and/or shield.
- There is to be NO throwing weapons unless they are specifically
designed for that purpose.
- There are to be NO "Louisville Slugger" (Baseball Bat
like) swings.
- There is to be NO charging. You DO NOT run at or advance towards
someone so that they have to get out of your way or get run over.
- There is to be NO unsafe shield maneuvers, that in any way harm
anyone else (i.e. NO punch blocking, shield bashing or contact with
another person. Your shield is NEVER to be used as a WEAPON).
- Only "Safe" weapons & shields are to be used. A qualified
Marshal may be requested to check the safety of any weapons or shields
at any time.
- There is to be NO live steel in any combat situation at any time
(live steel being metal knives, swords, axes, darts, spikes, spurs,
etc...)
- You may ask a Marshal to inspect anything at any time if you feel
something is unsafe.
- There is to be NO firing of arrows from a full draw, and arrows
should never strike a participant above the shoulders. Bows should
NEVER be used to parry an attack.
- Use your common sense. If something looks unsafe, it most likely
is unsafe. (If it runs like a fish and barks like a fish then it's
a fish.)
- HAVE FUN!!!
Counting Blows
In addition to the twenty-one safety rules, there are also rules for
how damage from contact with weapons is simulated.
- All hits - even the lightest touches - count as successful strikes,
with the following exceptions: the face following the eyebrow ridge
to the ears,
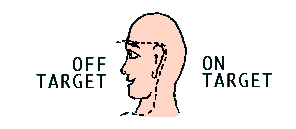 throat and hands (from the wrist bone
down to the fingers - and only when they are holding a weapon) are
all off target.
throat and hands (from the wrist bone
down to the fingers - and only when they are holding a weapon) are
all off target.
- Do not try to hit off target areas. If you do, it won't count. Groin
strikes on men and women and breast strikes on women are counted as
kills, but are not honorable and abuse may result in the removal of
the offender.
- "Wounds" disable from the end of the limb to the point
of the strike and on up to the closest joint. Wrists and ankles do
not count as joints for this. For example, if you are struck between
the elbow and the wrist, you lose the use of that arm from the elbow
down to the fingers. If you get hit in the toes, you lose the use
of that leg from the knee down to the toes.
- You are "killed" when you are struck in the torso (front
or back), head (above the eyebrows and behind the ears) or abdomen.
The lines dividing the limbs from the torso are like those on a doll.
- Every point of contact of your opponent's weapon(s) counts, so if
they hit your arm and then your leg, both are lost.
- If you are hit across both buttocks, you lose both legs and cannot
kneel, but should get in a sitting position.
- If you lose a leg, you should not use it at all, not even to balance
yourself when you are standing.
- When you lose an arm, try to keep it out of the way (i.e. behind
your back or down by your side) so it does not accidentally deflect
a blow. If you do accidentally deflect a blow with a 'dead' arm, you
should take the blow as if it had not been deflected. For example,
if you block a thrust to the gut with a dead arm, take it as a kill,
as if you had not deflected the blow.
- Verbally let your opponent know when you're taking a blow. When
you're hit in the arm, say "arm", when hit in the head,
say "dead", etc... If you are hit and your armor protects
you from that blow, say "armor".
- When talking during combat, avoid using words that sound like "hold".
Yelling that there is a "hole in the left flank" will probably
cause everyone to yell "Hold!" and then look at you waiting
for some explanation of what is wrong.
- If your hand is not on your weapon and it gets hit by a weapon,
you lose it and the arm up to the elbow.
- Deflected missiles still inflict damage until they have come to
rest.
- If you aren't sure whether or not your opponent hit you, it is honorable
to take the blow. Likewise, if you aren't sure if you were killed
or you just lost a limb, take the blow as a kill.
- If you think your opponent hit you before you hit them, and they
should therefore not take the wound you gave them because they had
already hit you, tell them not to take the blow.
- However, if you think you hit someone you should never tell them
that you hit them. It is extremely bad etiquette. You may ask them
if you hit them, but telling them that you hit them is an insult.
Anytime you spar with a new group of people, it is your responsibility
to make sure that you have a thorough understanding of the rules they
are fighting by.
The Spirit of the Rules
Every set of rules has loopholes and can be exploited by individuals
who are trying to win. The Spirit of the rules we play by is that anyone
should be able to play, and we should all be playing to have fun. The
sport of lightest touch combat should be accessible to anyone, of any
age and almost any ability. Your ten year old sister should be able
to compete against a muscle-bound hulk of a man and not get hurt. The
game stops being fun when people get hurt, and when people feel like
it's too dangerous to play. The rules are there for the safety of the
participants. Any exploitation of those rules should be dealt with harshly.
As an example, I have seen people looking around at their opponents
and revising their tactics when a HOLD has been called. I have also
seen people lower their opponents' defenses in combat by pretending
to ask questions about rules or the safety of weapons. People who demonstrate
an inability to conduct themselves responsibly should not be allowed
to participate.
Breaking the Rules
At some point in time, everyone will break the rules. They will hit
someone way too hard, or they will fail to take a blow, or they will
run into their opponent. These are the three most common ways that people
will break the rules. Not taking blows is commonly called "Rhino-hiding",
and running into your opponent during combat is called "Charging".
People who are not adequately trained often have problems with the
rules. However, there are many seasoned veterans who can be found rhino-hiding,
charging and hitting way too hard. Why are they doing this when they
should know better? Well, there are many things that go into someone
breaking the rules. Usually it can be boiled down to the fact that they
aren't playing for the right reasons. The "right" reason to
play any game is to have fun and let others have fun as well. All too
often, people find themselves trying to prove something to themselves
or to someone else while they are fighting. They may have brought their
lover to the event, and they don't want to look bad in front of them.
They may have been dumped by their lover the night before, and they
are letting their anger and frustration out on their opponents. They
might simply worry about how 'good' they are, and are trying to push
themselves to be the best, rather than trying to make sure that they
are having as much fun as they possibly can. They may only be able to
have fun if they win at least half of the tournaments they enter. Everyone
is different, and everyone has different reasons for why they break
the rules. I do believe one thing, which is that people don't intentionally
break the rules. They don't consciously decide to hit too hard, or run
into someone, or not take a blow. What usually happens is that their
adrenaline is running so high that they don't realize what they are
doing until afterwards, if at all.
If anyone ever lets you know they thought you were breaking the rules,
do not be offended. Everyone will break the rules at some point in time.
You will do well if you try your best to play by the rules and you respect
the opinions of other players on whether or not you are succeeding.
Above all, take every criticism seriously. If you find yourself out
of control, breaking rules or generally inhibiting everyone's enjoyment
of the sport, pull yourself until you've calmed down, gotten help or
gotten training if you need it. If you don't pull yourself out, a marshal
will!
So how do you deal with people who are having trouble with the rules?
You should always speak directly to them about what you think they are
doing. This can be extremely difficult with certain individuals, but
you will be doing them and everyone else they ever fight a big favor.
Always allow for the possibility that you were mistaken. There will
often be times when you would swear that you hit your opponent, but
you really didn't . Charges can be equally difficult to call. Don't
allow anyone to belittle your opinion. You are entitled to it, and you
should consider it your responsibility to inform someone you think is
breaking the rules that you think they are doing so. You do not have
to do this in a confrontational way. You should be trying to help them
improve, and should therefore try telling them in a helpful, friendly
way. If the person you have a problem with isn't listening to you, speak
with the Marshals that are supervising the combat. They are in the position
to take someone aside and work with them to get them to fight more safely.
Inspecting Light Weapons & Armor
Whether or not you know how to make a light weapon, if you are going
to be fighting, you should be able to inspect light weapons to determine
whether or not they are safe to fight with. It is your responsibility
to regularly inspect weapons you use to ensure that you never injure
another participant. You should inspect a boffer you are using before
you use it, at least once per hour for the duration of time you use
the weapon, and then once more when you are done with it. If you are
fighting in heavy brush or in woods you should inspect your weapons
more often, as there is a greater chance that the foam may get damaged.
To inspect a weapon, start at the handle. Check the pommel to make
sure it is still firmly taped to the weapon. If the boffer was made
without a pommel, make sure the penny that was (should have been) strapping
taped to the end of the pipe is still in place. If the penny is missing,
the weapon should be repaired. The weapon should have NO counter-weights
on the pommel or hilt of the sword. A counter-weight makes it easier
to move the blade and tip of the boffer quickly, making it more difficult
to control the strength of your blows. If the weapon has a counter-weight,
it should not be used. Next you should make sure that the blade and
the quillions (cross-guards), if there are any, are attached to the
pipe firmly. If the blade is not attached firmly, the boffer should
be repaired. Loose quillions are not unsafe, just useless and unsightly.
Next look along the blade of the boffer for dents or tears in the foam.
If you can feel or see the pipe through the foam or through the dent,
the weapon should be repaired.
Next, examine the tip of the boffer for any obvious breakdown of foam.
Hold the tip of the weapon in your hand and rock it back and forth.
Doing this should enable you to judge how firm the foam at the tip of
the weapon is. Most weapons need to be repaired because the tip breaks
down. This happens when the end of the pipe rubs against the inside
walls of the pipe foam, breaking down the strength of the foam and eventually
making the boffer unsafe for combat. When inspecting the tip of a weapon,
you want to evaluate whether the pipe foam has broken down enough so
that you can feel the tip of the pipe through the foam. If you can,
it's unsafe. However, DO NOT try so hard to find the end of the pipe
that you wind up breaking down the foam while inspecting the weapon.
Also DO NOT press your thumb into the side of the tip of the weapon
to find the pipe - it will break down the foam even worse. When wobbling
the tip of the sword in your hand you should also be able to judge how
much foam has been used past the tip of the pipe. If it wobbles too
much, it means that the inside of the foam will probably break down
quickly and the weapon, while safe for combat, will have a short lifespan.
If it doesn't wobble much at all, it means that there isn't enough foam
past then end of the pipe and the boffer is unsafe because it does not
provide enough cushion to protect opponents from being injured by thrusting
attacks. An adequate thrusting tip is an important safeguard against
injuries from thrusting attacks. However, don't forget that a hard,
unsafe thrust can hurt even if the boffer is safely constructed and
regularly inspected. If there is a squishy foam tip taped onto the thrusting
tip, make sure there are no pieces of tape or sharp corners sticking
out that could catch someone in eye.
Lastly, make sure the boffer does not flex too much or too little.
Simply put, we make our weapons rigid enough to enable us to have complete
control over their striking surfaces, but flexible enough to ensure
that if someone is hit too hard, the boffer will bend and help to prevent
the occurrence of serious injuries. If a weapon is too flexible, or
"whippy", and the wielder will not be able to control the
strength of their blows, it should be judged unsafe. If a boffer is
too rigid, and you do not feel that it will flex adequately if it strikes
someone to hard, it should also be judged unsafe.
Axe heads and mace heads should be inspected to ensure that they are
taped firmly to the blade of the weapon. Arrows should be inspected
to make sure their thrusting tips are adequate and their fletching won't
be hazardous to combatants. Arrows should be made out of golf-tubes
(light plastic tubes slightly over one inch in diameter). Wooden dowel,
"Flu-Flu" based arrows are unsafe due to the fact that if
they are stepped on in combat they can crack and then be unsafe for
subsequent firing. Golf tube arrows have proven to be safely re-usable
even after they have been stepped on in combat.
Armor is often inspected at weapon inspections. When inspecting armor,
look for protruding sharp edges that could injure people or damage the
foam of light weapons during combat. In addition, participants wearing
armor must be able to feel blows through the armor. For that reason,
heavy metal breastplates and heavy metal helmets have been judged as
unacceptable for lightest touch combat. Armor must also look authentic.
Football pads and bike helmets just don't cut it and should be discouraged.
Protective devices like kneepads or elbowpads can be worn, but should
not be counted as armor unless they look like armor.
Boffer Construction
Specifications
Before making a weapon, you will need to know how long to make it.
For safety reasons, restrictions on the lengths of weapons have been
developed.
1'0" - 3'8" = Single Short
3'8" - 5'0" = Hand and a Half
5'0" - 6'6" = Two Handed
6'6" - 8'0" = Two Handed Thrust Only
The construction of light weapons of less than 1' in length is strongly
discouraged. This is due to the fact that fighting with weapons that
short in size greatly increases the chance that combatants will strike
each other with their hands when attempting a strike with their weapons.
Weapons from 1' in length to 3'8" in length
are considered one handed weapons. They may be used individually, or
may be paired up with another one handed weapon or a shield. Weapons
of this length should be made out of 3/4" pipe. There are two types
of 3/4" pipe that are used in light weapon construction, CPVC 4120
('regular') and PVC 1120 SDR 21 ('lightwall'). The CPVC is yellow and
is heavier than the PVC, which is white and is often called 'lightwall'
because it has thinner walls and will yield a lighter weapon.
Weapons from 3'8" in length to 5' in length
are considered hand and a half weapons. Hand and a half weapons may
not be wielded with a shield or with another weapon, but may be used
with only one hand. Weapons of this length should be made out of regular
or lightwall 3/4" pipe.
Weapons from 5' to 6'6" in length are considered
two handed, and are unusable for attacking with only one hand. This
means that if you are using a two handed weapon and you lose one hand,
you may only parry, and should not use the weapon in an aggressive or
attacking manner. In addition, if you strike your opponent with the
weapon after you have lost one hand, you should tell them not to count
the blow. Weapons of this length should be made out of 3/4" lightwall
or 1" PVC pipe. It is possible to make a long weapon out of 3/4"
CPVC, but it is very difficult to cut the whip in the weapon down to
the point that it is safe to fight with.
Weapons from 6'6" to 8' in length are two
handed, and are considered unsafe to swing from side to side in combat.
You should use weapons of this length only for thrusting attacks, and
never for slashing attacks. Every contact made with the striking surface
of the weapon should be taken as a blow. However, if you strike your
opponent with a slashing motion, if possible, you should tell them not
to count the blow. Weapons of this length should be made out of 1"
PVC pipe.
Bows must have draw weights of 30 lbs or less. If
a bow gets hit by a weapon, it is considered destroyed and may no longer
be used in combat. A bow is considered a hand and a half weapon. This
means that it may not be held when a boffer or shield is being held
in your other hand, but it is legal to wield with one hand (if you can
do it safely). You should also never hit an opponent above the shoulders
with an arrow. It is unsafe, and you may be asked to stop doing archery
until you have learned to aim for below the shoulders.
Basic Sword Construction
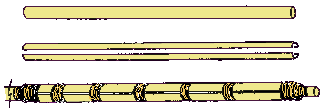
To construct a basic light weapon, you will need the following materials:
duct tape, strapping tape, electrical tape, pipe (3/4" CPVC, 3/4"
lightwall PVC or 1" PVC, depending on the length of the weapon
you're making), and foam pipe insulation for 3/4" pipe or 1 1/4"
pipe, depending upon the pipe you are using.
The 3/4" CPVC pipe should be used for weapons
under 4'6" and is yellow in color and comes in 10' lengths. The
3/4" lightwall PVC is harder to find, and should be used for weapons
under 5' long. It is preferable for weapons between 4'6" and 5'
long, as it is more rigid than 3/4" CPVC and will yield a less
whippy sword. Lightwall comes in 10' lengths as well, and is also less
expensive. You can make a 5' boffer out of 3/4" CPVC, but it takes
practice and skill to make one without much whip. 1" PVC pipe should
be used for weapons over 5' in length. Thinner, yellow pipe yields a
long boffer so whippy, it is practically impossible to control the striking
surface.
The foam pipe insulation should have a wall
thickness of 5/8". This size pipe insulation works well because
it is large enough that the tip of a boffer cannot easily fit into a
person's eye socket. While face shots are illegal, accidents happen,
and having thrusting tips larger than a person's eye socket will help
to decrease the chance of serious injuries occurring. We have had continued
success with Climatube pipe insulation, which comes in packages of four
3' long lengths of pipe insulation. Climatube is by far the pipe insulation
best suited for making light weapons that we have found, and we strongly
encourage you to go out of your way to get hold of it. Whatever you
use, it must be able to protect participants from the pipe inside and
it should have a wall thickness of at least 5/8". Assuming you
make the sword correctly and fight safely, it should also stand up to
months of combat without breaking down much.
You will also need two pennies for every sword you are going to make,
a hacksaw or hacksaw blade to cut the pipe and a knife or scissors to
cut the tape and foam with. If you can, get some 'squishy' foam, either
from an old mattress or from a craft or fabric store. It will make your
swords a tad safer, and much lighter.
If this is your first experience sword-making, I recommend buying 3/4"
CPVC pipe and cutting it into three lengths of about 3'3" or 3'4"
each. If you are making a sword of a specific length, like 3'8"
so that you can have length but still be able to use the sword with
a shield, you will need to determine the exact length of pipe you will
need. To do this, take your desired length, subtract 2" for the
thrusting tip you will put on the end of the pipe, subtract the thickness
of the squishy foam you will be using (usually 2" - 3") and
subtract 1" for the pommel, if you are going to put one on the
weapon. The result is the length of pipe you will need. If you were
making a 3'8" sword, were using 3" squishy foam and were putting
a pommel on it, you would need 3'2" of pipe.
There are several ways to cut your pipe. Hacksaws work well, as do
circular pipe-cutters. Both can be found at most hardware stores, and
if you want you can just buy and use a hacksaw blade - just make sure
you don't cut your hands. Also, make sure you don't breathe the dust
that will be kicked up into the air if you saw the pipe. If you cut
the pipe with a hacksaw blade, you will find that the edges of the pipe
where you cut it are sharp. Taking a knife, sandpaper, a file, or anything
else you can think of that will do the job, scrape down the sharp outside
edge of the ends of the pipe so that it is slightly rounded or slanted.
Doing this will pay off in the long run, as the next step is to cut
two 3" pieces of strapping tape and tape a penny onto the end of
the pipe. Do the same for the other end. This will prevent the pipe
from going through the foam at the end of the sword when you make a
thrust. The last thing you want to do is take a core sample of your
opponent!
After you have strapping taped the pipe, you
need to cut off a 1.75" length of pipe foam. If you are making
a boffer with 1" pipe, you will need to use a 2" length of
foam to compensate for the larger diameter of the pipe foam you will
be using. Take this short tube of pipe foam, find where the seam is
and cut along it with your knife. 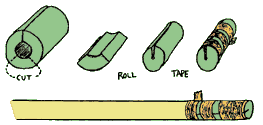 Then you will need to make two more cuts, parallel
to the seam of the pipe foam, so that you will have three equal sized
lengths of foam. A easy way to judge where to make your cuts is to place
the foam on its end, with the seam at the 12:00 position and make your
cuts at the 4:00 and 8:00 positions (1/3 and 2/3 of the way around the
circle). Now you will need to cut three 2" pieces of strapping
tape. Take the foam and roll it and than tape it into the shape of a
plug, with the end about the size of a penny. Then tape this plug onto
the end of the pipe with a 3" long piece of strapping tape. This
plug will be the core of your weapon's thrusting tip. The thrusting
tip of a boffer is the portion of foam on the end of a weapon that extends
past the end of the pipe. A legal thrusting tip is at least 1.75"
long (or 2" long for a boffer made with 1" pipe) to help prevent
injuries in the event of an accidentally hard thrust or lunge.
Then you will need to make two more cuts, parallel
to the seam of the pipe foam, so that you will have three equal sized
lengths of foam. A easy way to judge where to make your cuts is to place
the foam on its end, with the seam at the 12:00 position and make your
cuts at the 4:00 and 8:00 positions (1/3 and 2/3 of the way around the
circle). Now you will need to cut three 2" pieces of strapping
tape. Take the foam and roll it and than tape it into the shape of a
plug, with the end about the size of a penny. Then tape this plug onto
the end of the pipe with a 3" long piece of strapping tape. This
plug will be the core of your weapon's thrusting tip. The thrusting
tip of a boffer is the portion of foam on the end of a weapon that extends
past the end of the pipe. A legal thrusting tip is at least 1.75"
long (or 2" long for a boffer made with 1" pipe) to help prevent
injuries in the event of an accidentally hard thrust or lunge.
The next step is to run strapping tape up the bare pipe. The purpose
this serves is twofold. If done properly, it will help to cut down the
flex in the weapon. It will also help to ensure that if the boffer ever
breaks, the pipe (hopefully) won't go flying. If you ever manage to
break a boffer while fighting, you should put serious thought into toning
down your fighting style. If you're hitting your opponent as lightly
as you can and not locking your boffer up in a strength contest with
them you should never end up breaking a weapon.
The first way to run strapping tape up the pipe
is to spiral it along the pipe, leaving a gap between each spiral that
is about as wide as the tape is. 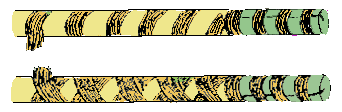 The fewer wrinkles you
leave in the strapping tape, the better the result will be and the less
whip the sword will have. Once you have spiralled the tape down the
weapon, do it again in the opposite direction so that the tape crosses
over the previous tape, leaving diamonds of exposed pipe. You aren't
trying to cover all the pipe. If both spirals are without wrinkles and
you left gaps between the spirals as wide as the strapping tape, you're
doing well.
The fewer wrinkles you
leave in the strapping tape, the better the result will be and the less
whip the sword will have. Once you have spiralled the tape down the
weapon, do it again in the opposite direction so that the tape crosses
over the previous tape, leaving diamonds of exposed pipe. You aren't
trying to cover all the pipe. If both spirals are without wrinkles and
you left gaps between the spirals as wide as the strapping tape, you're
doing well.
The second way to apply strapping tape to the pipe is simply to run
a strip up one side and down the opposite side, and then to run a strip
up and down the two remaining sides. This will not help much to cut
down the whip of a weapon, but will be sufficient for most weapons under
4' in length.
Next you need to decide how long the blade of your boffer will be.
You will need at least enough room for one hand to fit onto the handle,
and you might choose to have as much as a foot or more of handle to
use. As the pipe foam comes in 3' lengths, it is easiest to have a blade
no more than 3' in length. When deciding this, keep in mind that the
pipe foam will cover the pipe and the 1.75" long plug you taped
onto the end of the pipe. Once you have cut the length of pipe foam
you want, you will slide it onto the pipe. Make sure that the end of
the plug at the tip of your weapon is inset by about 1/4". This
is because when fastening the foam onto the pipe and then when using
the weapon, the foam will both slide down slightly and compress. If
you don't have the plug inset by about 1/4", it may end up poking
out of the end of your boffer by about that much. Now there are two
good ways I have found to do actually fasten the blade to the pipe.
The first way to attach the pipe will result
in the foam at the base of the blade tapering down to the pipe.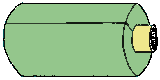 After you have the foam in position, use a knife to
shave away foam from about 3" up the blade down to the end of the
foam. Once you have gone around the pipe, so that all sides of the pipe
foam taper down to the handle, you are ready to attach the blade. Using
strapping tape, from the point at which it begins to taper, spiral the
tape down the foam, overlapping each time around, but by no more than
half the width of the tape. You need to overlap the tape to make sure
it will stay on, but if you overlap too much, you will just be adding
extra weight to the boffer - something you always want to avoid. Continue
to spiral the tape down onto the pipe for about 2" so that it is
firmly attached to the pipe. Lastly, test the job you did by gently
trying to pull the foam off of the pipe. If shouldn't move at all if
you did a good job.
After you have the foam in position, use a knife to
shave away foam from about 3" up the blade down to the end of the
foam. Once you have gone around the pipe, so that all sides of the pipe
foam taper down to the handle, you are ready to attach the blade. Using
strapping tape, from the point at which it begins to taper, spiral the
tape down the foam, overlapping each time around, but by no more than
half the width of the tape. You need to overlap the tape to make sure
it will stay on, but if you overlap too much, you will just be adding
extra weight to the boffer - something you always want to avoid. Continue
to spiral the tape down onto the pipe for about 2" so that it is
firmly attached to the pipe. Lastly, test the job you did by gently
trying to pull the foam off of the pipe. If shouldn't move at all if
you did a good job.
The second way to attach the pipe will result
in the end of the foam at the top of the handle not being tapered at
all. After you have the foam in position, cut four 3" pieces of
strapping tape. 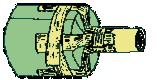 Place these pieces on four
sides of the base of the blade so that they start on the blade, and
run down to the pipe and along the pipe for at least 1". Then run
a piece of strapping tape around the ends of the tape on the blade and
run a piece of strapping tape around the ends of the tape on the pipe.
Now you need to cut four more 3" pieces of strapping tape. Take
the pipe foam and twist it on the pipe before attaching these four pieces
of tape, in the same fashion as the first four were attached. Then run
a piece of strapping tape around the ends of the four new pieces of
tape at the base of the blade and at the top of the handle to attach
them securely. Test the job you did by gently trying to pull the foam
off of the pipe. If shouldn't move much at all if you did the taping
correctly.
Place these pieces on four
sides of the base of the blade so that they start on the blade, and
run down to the pipe and along the pipe for at least 1". Then run
a piece of strapping tape around the ends of the tape on the blade and
run a piece of strapping tape around the ends of the tape on the pipe.
Now you need to cut four more 3" pieces of strapping tape. Take
the pipe foam and twist it on the pipe before attaching these four pieces
of tape, in the same fashion as the first four were attached. Then run
a piece of strapping tape around the ends of the four new pieces of
tape at the base of the blade and at the top of the handle to attach
them securely. Test the job you did by gently trying to pull the foam
off of the pipe. If shouldn't move much at all if you did the taping
correctly.
The next step after you have attached the blade of your weapon is to
run a single piece of strapping tape along the seam of the foam. This
is not required, but is a very good idea. The weakest part of the pipe
foam is the seam, and that is where it will be most prone to breakdown.
Having a piece of strapping tape run along the seam of the blade will
help to reinforce that weakness, resulting in a light weapon that will
last just a little bit longer.
Now that you have attached the blade of your
weapon, you need to decide whether or not to put a pommel on the weapon.
You should know that pommels with less than 1' of foam cannot be considered
striking surfaces. Pommels with over 1' of foam can be legal striking
surfaces, and shall hereafter be called butt-spikes. As this is a lightest
touch sport, when you are in combat you should take damage every time
you strike, or touch, yourself with any striking surface on your weapon,
including butt spikes. Pommels and butt-spikes are not required.
If you are going to make a pommel that will be a legal striking surface
it must have a legal thrusting tip. A legal thrusting tip is a tip that
would qualify as a safe thrusting tip if it were on the point of the
weapon. This means that it must be at least 1' long and have a plug
1.75" long on the end of the pipe. If you are not going to have
the pommel be a legal striking surface, you can still put a plug on
the end of the pipe, but it can be shorter than 1.75". Over the
plug you will need to put pipe foam, overlapping at least 1/2"
onto the pipe. You can use either of the methods described earlier to
attach the pipe foam onto the pipe when making your pommel. You can
also invent your own way of constructing a pommel, providing you do
not add excessive weight or construct something that would be unsafe.
The next step is to put on the squishy foam tip
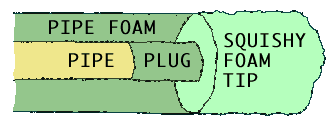 , if you are going to use one. Squishy foam tips won't
make weapons much safer than they already are, but they will make the
boffer feel lighter than another weapon of the same overall length made
without a squishy foam tip. The first thing you need is a block of foam
that is large enough to cut into a cylinder that will be about the same
diameter as your blade, and about 3" long. You can find old foam
mattresses that will yield more foam than you will (probably) ever need.
You can also buy foam in sheets of varying thicknesses at fabric or
craft stores. Once you have cut your squishy foam tip, you should attach
it to the pipe foam by running a piece of strapping tape from the tip
of the pipe foam, up one side of the squishy foam, across the top and
down the other side onto the pipe foam again.
, if you are going to use one. Squishy foam tips won't
make weapons much safer than they already are, but they will make the
boffer feel lighter than another weapon of the same overall length made
without a squishy foam tip. The first thing you need is a block of foam
that is large enough to cut into a cylinder that will be about the same
diameter as your blade, and about 3" long. You can find old foam
mattresses that will yield more foam than you will (probably) ever need.
You can also buy foam in sheets of varying thicknesses at fabric or
craft stores. Once you have cut your squishy foam tip, you should attach
it to the pipe foam by running a piece of strapping tape from the tip
of the pipe foam, up one side of the squishy foam, across the top and
down the other side onto the pipe foam again.  You need to make sure the squishy foam is held to the
pipe foam, but is not compressed by the strapping tape. Next, run a
second piece of strapping tape up one side of the squishy foam and down
the other, so that the tip will have an 'X' of strapping tape on its
end. Lastly you will need to run at least one piece of tape around the
base of the squishy foam where it meets the pipe foam, so that the squishy
foam is firmly attached to the pipe foam.
You need to make sure the squishy foam is held to the
pipe foam, but is not compressed by the strapping tape. Next, run a
second piece of strapping tape up one side of the squishy foam and down
the other, so that the tip will have an 'X' of strapping tape on its
end. Lastly you will need to run at least one piece of tape around the
base of the squishy foam where it meets the pipe foam, so that the squishy
foam is firmly attached to the pipe foam.
You should now have in front of you a naked light weapon. It should
be perfectly safe to fight with. The next step is to put duct tape along
the blade. Grey duct tape is recommended, and looks as much like steel
as duct tape ever will. Black and white are popular and brown is popular
for a wooden look. Certain gaming systems may have restrictions on colors
of duct tape you can use for your weapons. If you are planning to play
in a particular gaming system, it's a good idea to educate yourself
about a system's restrictions before you make weapons you want to bring
to those events.
There is a right and a wrong way to put duct tape on a weapon's blade.
The wrong way is to spiral it down the blade. This will result in an
ugly, heavy, usually unsafe weapon. The right way is to run the duct
tape from the top of the handle up the length of the blade, across the
top and down the other side. It is very important to not put undue pressure
on the foam when doing this - especially on the squishy foam tip or
when running the tape down the other side of the weapon. When doing
this you want to pull the tape off the roll with your hand and then
lay it down on the blade where you want it to lie. When you lay the
tape down from the tip to the handle, you need to make sure that it
is on the other side of the blade, so that the two strips of uncovered
foam are of about the same size. Then you should smooth the tape down
against the blade foam. Next you need to lay duct tape down on the exposed
foam, running it from the handle up to the tip, and then down the other
side again. This can be a difficult and frustrating job at first. The
tape will stick to itself constantly, and your blades may have lots
of wrinkles, but the more you make weapons, the easier it will get.
After you have covered your blade, check the tip for sharp corners of
tape, and trim them if you find any. If you have a squishy foam tip
you will need to make sure that there are holes in the duct tape so
that air can get into the squishy foam and allow it to compress easily
upon impact. If you have a pommel, you should cover the pommel of your
weapon with duct tape.
Next you need to run a strip of electrical tape from the top of the
handle, up one side of the blade of your boffer and down the other side
onto the handle again. This 'blade tape' will represent your weapon's
edge. You are not required to hit them with the tape, but having the
tape on your weapon makes it an edged weapon, rather than a club or
long stick. You can still use a boffer without blade tape and claim
that it is an edged weapon. Since this is a lightest-touch counts sport,
the blade tape is more for aesthetics and for better roleplaying than
anything else. Next, you should spiral-wrap electrical tape down the
handle from the bottom of the blade to the top of your pommel (if you
have one). You can use many other things to wrap the handle of your
weapon, but electrical tape works, and is certainly good to start with.
Using decorative cord or dyed clothesline can result in a much nicer-looking
sword. There are also handle wraps made for other sports like tennis,
racquetball and baseball that you might want to look into.
There are groups which cover their weapons not with duct tape, but
with cloth. They sew long tubes of fabric which they slide over the
blades of their swords. This provides more variety for weapon decoration,
but you need to make sure the fabric you use is light enough that it
won't make the boffer unsafe.
You should now have a functional, ready-to-use light weapon in front
of you. However, light weapons can be much more than just foam batons.
You can have maces and axes, quarterstaves, pikes, polearms, bows &
arrows, javelins and much more. I have seen a light weapon created that
looked exactly like a guitar, and one that looked exactly like a rifle.
They were amazing works of foam-smithing, and were both safe for lightest
touch combat. In the remainder of this section, I will delve into the
construction of more advanced light weapons.
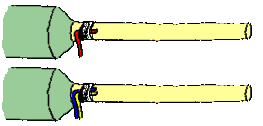
Cross Guard / Quillion Construction
Cross-guards, or quillions, are pieces of foam that protrude from the
base of the blade, right above the handle of a sword. Their purpose
is to aid in parrying sword blows. They can be be made in many shapes
and sizes, and can be extremely intricate and decorative.
On a light weapon, quillions must be made of foam. The weight of a
cross-guard may slow down your weapon, but if you learn to use them
well, it can be a worthwhile trade-off. You can put quillions on a boffer
that has already been made, or you make them part of the initial design
of a new weapon. You just have to make sure that the handle of your
sword will be long enough for you after you've attached your cross-guard.
When practicing making swords with cross-guards, you will be reminded
of one of the basic tenets of good foam-smithing; use strapping tape
for strength. Because your cross-guard will be made of foam, it won't
have any pipe inside of it and will tend to be quite flexible. However,
if it is taped down properly, it will be quite rigid and will not bend
much when parrying sword blows. With this in mind, let's begin.
Before you worry about making a cross-guard, you need to have made
the boffer you are going to be putting it on. You might want to wait
to put duct tape and blade tape on the weapon until after you've attached
the cross-guard. You want a 'naked' boffer - just pipe, pennies, foam
and strapping tape. It's also easiest to put a cross-guard on a boffer
before it has a pommel. You can put a cross-guard on a finished weapon
without having to take off the duct tape and blade tape, but it's easier
to do it with a 'naked' weapon.
You first need to decide how long your cross-guard will be. I would
recommend making it protrude at least 3" from the blade of your
weapon, so that it will actually be able to catch a blade sliding down
your own blade. I would also recommend that you make the cross guard
protrude no more than 6" from the blade of the weapon. The longer
you make the cross-guard, the harder it is to tape it down so that it
doesn't bend too much. Once you've decided how long you want your cross-guard
to be, cut a piece of pipe foam that will be the correct length. A good
way to make sure you have the right length is to hold the foam against
the sword where you want to cross-guard to be. When you've cut the correct
length, use a ruler to determine the halfway point of the length of
foam. If you don't center your cross-guard on your boffer it will still
work, but it won't look as good. Once you've found the center point
of your cross guard, cut a hole through it that is slightly smaller
than the 3/4" pipe you are using. You then should slide the cross-guard
onto the pipe and up to the base of the blade. You may need to shave
or trim the top side of the cross-guard so that it sits flush against
the base of the blade.
Next, you should plug the sides of the cross-guard pipe foam in the
same way that you plugged the thrusting tip of the weapon. A core of
foam inside the cross-guard will add stability and strength. You may
be wondering at this point why I don't recommend using a cross-piece
of pipe to stabilize the cross-guard. There are a number of reasons,
the first of which is that it isn't necessary. You can do a perfectly
adequate job using just tape and foam. Secondly, I do not know of any
methods of attaching pipe to pipe that does not result in the boffer
having a break-point at that intersection. The last thing you want to
happen in combat is for your weapon to break in half. It's embarrassing
and unsafe. Many glues will corrode and weaken the pipe, bonding the
two pipes, but yielding a weaker boffer than one made without pipe in
the cross-guard. If any readers of this guide have found a successful
way to bond pipe to pipe, please write in and let me know about it.
Thirdly, pipe is heavier than foam, and using more pipe will result
in a heavier weapon. Heavy weapons are slower, and can be harder to
control than light weapons.
After you've plugged the cross-guard, you need
to attach it to the blade. This is difficult to do well without using
an abundance of tape and making the boffer much heavier than it needs
to be. You will use strapping tape, as it is sturdier than duct tape
and electrical tape. 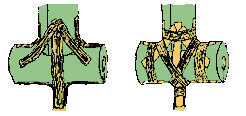 First, run four pieces
of strapping tape from the blade to the cross guard, on all four sides
of the blade. The two pieces that have to bend 90 degrees to continue
along the cross-guards are key. When attaching them, bend the cross-guard
up, so that when the tape is attached there is tension in the tape,
pulling the cross-guard upwards slightly. The tape should not go into
the corner of the joint, but should be pulled off of the foam slightly.
Then you will run a piece of tape around the ends of the tape, once
on the blade and one on each cross-guard. Then you will run a piece
of tape across the joint, forming an "x" on the face of the
cross-guard and applying more tension to the tape that runs from the
cross-guard to the blade. The tape providing tension that pulls the
quillions upwards will help keep it from bending downwards under pressure.
After you have fastened the cross-guard to the blade, you should also
fasten the cross-guard to the pipe handle. You don't need to worry as
much about taping tightly on the underside of the cross-guard, as it
is more important that the guard does not bend down. You will rarely
parry a sword with the underside of your cross-guard, so you don't need
to worry about the cross-guards bending up towards the blade.
First, run four pieces
of strapping tape from the blade to the cross guard, on all four sides
of the blade. The two pieces that have to bend 90 degrees to continue
along the cross-guards are key. When attaching them, bend the cross-guard
up, so that when the tape is attached there is tension in the tape,
pulling the cross-guard upwards slightly. The tape should not go into
the corner of the joint, but should be pulled off of the foam slightly.
Then you will run a piece of tape around the ends of the tape, once
on the blade and one on each cross-guard. Then you will run a piece
of tape across the joint, forming an "x" on the face of the
cross-guard and applying more tension to the tape that runs from the
cross-guard to the blade. The tape providing tension that pulls the
quillions upwards will help keep it from bending downwards under pressure.
After you have fastened the cross-guard to the blade, you should also
fasten the cross-guard to the pipe handle. You don't need to worry as
much about taping tightly on the underside of the cross-guard, as it
is more important that the guard does not bend down. You will rarely
parry a sword with the underside of your cross-guard, so you don't need
to worry about the cross-guards bending up towards the blade.
Once you've taped the cross-guard securely to the blade and the pipe,
you might want to run a piece of strapping tape along the seam of the
foam, and across the ends of the foam. It's not absolutely necessary,
but it certainly won't hurt. At this point, if you're satisfied with
the strength of the cross-guard, you are ready to cover it up with tape.
I recommend black duct tape, as it's light, looks good and is easy to
work with. You can use grey duct tape if you want to. Electrical tape
is also a popular choice, but you need to be careful that you don't
overlap the tape too much. Wrapping your cross-guard, handle and pommel
with too much electrical tape is a sure-fire way to make an awkward,
heavy weapon.
There are many types of cross-guards you can make. You can have four
quillions instead of two. Your quillions can point upwards forming a
'V'. They can point downwards to protect your hand. You can bend and
tape the foam so that the cross-guard goes out from the base of the
blade and then comes back to attach to the pipe where the pommel would
be, forming a basket hilt. You can cut many thin pieces of foam, tape
them well and form an intricate and decorative basket hilt if you have
the time and the skill.
There are some no-no's to cross-guard construction that you should
keep in mind. Don't put spikes on your cross guard and plan to actually
use them. When you have a blade coming off of pipe at anything even
close to a 90 degree angle, it is called a 'punch dagger'. This is unsafe,
and if you can't figure out why, read the chapter on "Punch Daggers,
Morning Stars & Flails". In a nutshell, the last thing we want
in lightest touch combat is people doing anything even resembling punching
each other. It's just not a good idea. Another thing you shouldn't do
is have decorative spikes on your boffer that are thin enough that they
could poke someone's eye. Our thrusting tips are large enough that they
usually won't fit into someone's eye socket. This is intentional. Anything
can happen, and probably will, so fighting with a boffer with long thin
foam spikes is just asking for trouble. Sure, they're foam, but an accidental
thrust to the eye-socket is unpleasant enough even with safe, legal
thrusting tips. If you caught a thin foam spike in the eye you could
be seriously and permanently injured. Also, don't forget that no matter
how safe your weapon is, if you're hitting people in the face or throat,
you're fighting unsafely. One last thing to keep in mind. Don't construct
a boffer with the express purpose of using it's cross-guards to bind
up your opponents weapon so they can't pull it away. This creates a
strength-on-strength situation, which is something we try to avoid in
lightest touch combat. If your opponent is pulling or pushing as hard
as they can because you caught their boffer in your cross-guards, when
it comes loose it will have a lot of force behind it. I have seen people
clock their opponents because they were pushing against a bind and their
weapon slipped loose. It is as much the fault of the person who bound
up their opponent's boffer as it is the fault of the person whose weapon
was bound.
One last word on cross-guards. They're a wonderful place to put a mark,
symbol or insignia, if you have one. Some foam-smiths mark all of the
weapons they make with a symbol. You can also put mysterious runic inscriptions
on your cross-guard. You can even name your boffer and write the name
on the cross-guard. Putting your own name on your boffer is, of course,
a good way to find it again if you ever lose it at an event. You can
write or put any of these things on the blade of the weapon, too. Gold
and Silver permanent markers are very popular for writing on weapons.
Whatever you use, experiment with it first to make sure it won't smear
or rub off. Lastly, creating and using weapons with a unique cross-guard
style is a way you can make your character more distinct if you play
in a live-action fantasy roleplaying game.
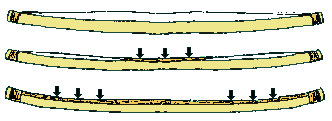
Long Weapons & Whip
Whip is the term used to describe how much a boffer will bend when
you swing it and stop the swing. Stopping the swing of a light weapon
at the surface of your opponent's skin is called 'pulling a blow'. You
are pulling back the swing of the boffer at the surface of their skin
so that you strike them as lightly as possible. When fighting against
a skilled opponent, you will need to move your weapon very quickly,
and the ability to pull your blows is very important. You may still
get hit solidly by your opponent. The bottom line is that no one should
get hurt in lightest touch combat. So where does whip come into all
this? When you swing a boffer and stop the swing, the weapon may bend.
The amount it bends is dependent upon how long the boffer is and how
well it was constructed. Ideally, we want the boffer to bend enough
so that if someone caught a thrust in the gut/eye/throat, the weapon
would bend under the blow, reducing the chance that an injury would
occur. However, we also need the boffer to be rigid enough that you
will be able to have control over all striking surfaces of the weapon
at all times. If you can't control the striking surface of your weapon,
either you shouldn't be fighting or you shouldn't be using that weapon.
So where is the line between too whippy and too stiff? Well, right now
it's a judgement call that is best learned through practice and experience.
I know that's not a very good answer, but with practice it's easy to
learn for yourself what is too whippy and what is too stiff. For example,
someone who says they can control the tip of a boffer they have designed
specifically to bend over the top of a shield and hit the shieldman
on the top of the head should be told to go make another weapon.
Weapons under 4' in length are generally not whippy enough to be a
problem. When you get into the 4' - 5' range and are still using 3/4"
CPVC you are going to start having problems. Using lightwall (white
3/4" PVC) will help to alleviate the whip in these weapons, but
lightwall can be hard to find. Whip can also be a problem with long
1" pipe weapons, especially if they have heavy squishy-foam tips.
The weight of a squishy foam tip will increase the whip in the weapon
substantially. For this reason, you will find cutting whip down in an
8' long pike easier than cutting the whip down in a 7' long pole-axe.
So how do you cut whip down? The best way is to apply the strapping
tape to the bare pipe with great care when you first construct your
weapon. If you do it properly and left few wrinkles it should do much
to cut down the whip of your weapon.
There is a second way to cut down the whip of a long weapon. Run strapping
tape up the pipe by bending the pipe slightly and running it straight
from penny to penny. The result should be reminiscent of a strung bow.
Then you should push the tape onto the pipe starting from the middle
and going out to the pennies so that the tape provides tension on the
pipe, curving it slightly when it is completely attached to the pipe.
Anchoring the tape to each end with a short strip of strapping tape
might be a good idea before you try this. Next, you need to repeat the
process on the other side of the pipe. Then you should do the same for
the remaining two sides. Ideally, all four sides of the pipe will be
covered with strapping tape and the pipe will be straight. I have found
that this method is more difficult to do successfully than the first
method.
The third way to cut down the whip of a long
boffer is to give it a split-pipe handle. This method is really only
good for hand and a half weapons made out of 3/4" pipe. First you
need to determine how long the handle on your weapon will be. Then you
should cut a piece of 3/4" pipe of that length. The next step is
to halve the pipe, lengthwise! If you can successfully do this, you
then tape the two halves of pipe on opposite sides of the pipe you are
using for your weapon, right where you want the handle to be. You'll
want to use strapping tape to secure the pipe halves to the handle so
that they don't move much when the boffer flexes. The result should
work to cut down whip, and yields an interesting grip to boot!
One last thing you can do to help cut down whip
is to put a tightly wrapped rope handle on your sword. The rope helps
to stabilize the handle of the sword, and it looks good too!
Both double-sided carpet tape and glue work well to keep the rope or
cord from loosening and sliding up and down while you're using the weapon.
You would also do well to strapping tape the ends of the rope so that
it doesn't unravel on you.
Whatever you try to do to keep the whip in your weapons down, make
sure you strapping-tape the pipe adequately. Just putting a rope-wrapped
split-pipe handle on your 5' sword won't cut it. The boffer will just
flex uncontrollably from the top of the handle on up to the tip.
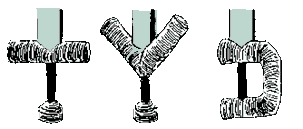
Axe & Mace Construction
Maces and axes aren't too difficult to make. The primary consideration
when deciding to make a mace or an axe is how large the mace head or
axe head will be. The larger it is, the heavier the boffer will be,
and the more difficult it will be to fight effectively with it. Maces
usually have a head that protrudes around the tip of the weapon on all
sides. Axes usually have one head, or blade, but sometimes have a second
blade on the other side of the weapon.
So what do you do differently when making a mace or an axe? Well, if
you were to simply tape an axe or mace head onto the end of a sword,
several things might happen. If the sword is relatively long and/or
the axe/mace head is relatively large the boffer will become extremely
whippy. The extra weight will make it difficult to control the tip of
the weapon. The only way to make sure that your axe or mace isn't too
whippy is to make it and find out. I do not recommend trying to make
long weapons with 3/4" pipe and putting axe or mace heads on them.
It's just asking for trouble. Generally axes and maces tend to be made
up to 3'8" long (the maximum length for a one-handed weapon). Making
a huge double-bladed butterfly axe can be fun, and might look neat,
but fighting effectively with one is difficult, and may require drastic
changes in your fighting style.
In addition, if the blade of your axe or mace is attached to the pipe
of the boffer at the top of the handle, like most normal swords, the
tip will tend to twist around the pipe. This is more of a problem with
axes, as axe heads usually stick out further from the pipe of a boffer
than mace heads do. While this is not unsafe, it can shorten the lifespan
of the foam and it is annoying in combat. The larger and heavier your
weapon is, the greater a problem twisting will be. A 2' hand axe might
not twist at all, but the head of a 7' pole-axe will probably twist
a lot. There is a way to solve this problem, and it is worth doing on
larger weapons.
The first thing you do is determine what size
and shape your axe head will be. The most common material to make axe
heads out of is squishy foam. Keep in mind when designing your axe head
that it should have no long pointy edges that could catch someone's
eye. Once you have cut your axe head out of the squishy foam, you need
to decide where you want to attach it on your weapon. Instead of attaching
the entire length of blade foam to the pipe, you will need to cut a
length long enough to reach from the tip of the boffer (the foam plug,
not the penny) to the bottom of the axe head, where it will be taped
to the pipe foam.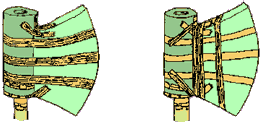 Then you should tape this length of foam to the pipe
securely. Do not shave the bottom of the length and then spiral-tape
it. After it is secure, tape the axe head to the pipe foam. When doing
this, keep several things in mind. If you use too much strapping tape
the boffer will be really heavy. However, you also need to tape it securely
so it does not rip off in combat. (I'm not joking. You will someday
find yourself in a tug of war with someone whose weapon you accidentally
caught in a bind with your axe-head.) When you have strapping-taped
the axe head to the pipe you can slide more pipe-foam up the boffer
from the pommel end. Be sure to strapping-tape it to the pipe-foam at
the head of the weapon and to the pipe at the top of the handle. Once
this is done, you are ready to put on a pommel and then cover the blade
in duct tape. It is common practice to run electrical tape along the
axe head to represent an edge. The last thing you need to do is take
a knife or scissors and make lots of holes in the duct tape so that
air can flow in and out of the foam axe head. This will allow it to
compress when it hits someone, cushioning the blow. Having a squishy
axe head on your boffer does not mean that you should hit your opponents
harder. It does make large, unwieldy weapons like pole-axes much safer
to fight with, though.
Then you should tape this length of foam to the pipe
securely. Do not shave the bottom of the length and then spiral-tape
it. After it is secure, tape the axe head to the pipe foam. When doing
this, keep several things in mind. If you use too much strapping tape
the boffer will be really heavy. However, you also need to tape it securely
so it does not rip off in combat. (I'm not joking. You will someday
find yourself in a tug of war with someone whose weapon you accidentally
caught in a bind with your axe-head.) When you have strapping-taped
the axe head to the pipe you can slide more pipe-foam up the boffer
from the pommel end. Be sure to strapping-tape it to the pipe-foam at
the head of the weapon and to the pipe at the top of the handle. Once
this is done, you are ready to put on a pommel and then cover the blade
in duct tape. It is common practice to run electrical tape along the
axe head to represent an edge. The last thing you need to do is take
a knife or scissors and make lots of holes in the duct tape so that
air can flow in and out of the foam axe head. This will allow it to
compress when it hits someone, cushioning the blow. Having a squishy
axe head on your boffer does not mean that you should hit your opponents
harder. It does make large, unwieldy weapons like pole-axes much safer
to fight with, though.
There is a way to make an extremely light, small axe head that will
take little away from your fighting speed. You cut a small rectangle
of foam about 4" by 9" and as wide as your pipe foam. You
attach it to the boffer with strapping tape except that you do not put
strapping tape across the side of the axe head. Once it seems securely
attached, you use a scissors or knife and cut out the center of the
axe head, leaving about 1.5" on all sides of where the axe-head
was. Then you put duct tape on the boffer in such a way that it bridges
the hole you cut out, giving the axe-head some stability and strength
without sacrificing much lightness or speed in the weapon. This isn't
the easiest way to make an axe, but it's worth trying.
Compared to axes, maces are fairly easy to make. Most are made by taking
a piece of pipe foam, splitting it down the middle and wrapping it around
the tip of a sword. You can do many variations on this theme. Squishy
foam is recommended if you attempt anything bulkier than a mace. Clubs
made out of lots of squishy foam look neat but are invariably slow,
clumsy weapons.
Dicky Weapons of Doom
"Dicky Weapons of Doom" is a term originally meant to describe
any bizarre, strange or otherwise imaginative boffer made by a creative
and talented foam-smith. An example of Dicky Weapons of Doom might be
a pair of daggers whimsically constructed to look like egg-beaters.
A Dicky Weapon of Doom might be slightly more realistic, looking like
a three-pronged dagger or a four bladed hand axe. The term "Dicky
Weapons of Doom" originated as the name of a tournament designed
to reward creative foam-smiths by only allowing them to enter, using
their Dicky Weapons of Doom, of course. Dicky Weapon of Doom tournaments
have also been run as Dinky Weapons of Doom, with the added requirement
that the weapon must be under 2' in length.
I do have one hint that might help you make more interesting Dicky
Weapons of Doom. It is possible to bend CPVC pipe by heating the pipe.
You need to be very careful when you do this. Use whatever protective
gear and precautions you need to handle the heating device you are using.
Try using a heat gun (like a hair dryer, but much hotter). Any heating
of pipe should be done with great care in a well ventilated area. Make
sure any pets - especially birds - that might be sensitive to fumes
released when heating the pipe are not nearby. When you bend the pipe,
it will weaken it. Do not let the surface of the pipe get brown or start
to blister. Do not make long weapons using bent pipe, as they will more
than likely break. Bent pipe is best used in small weapons like Dicky
Weapons of Doom.
Quarterstaves & 2 bladed weapons
Quarterstaves, pole arms that have butt-spikes and other two-bladed
weapons can be made and used safely in lightest touch combat. There
are several things you need to keep in mind if you are planning to make
a two-bladed weapon. Both ends of the boffer must have striking surfaces
at least 1' long and legal thrusting tips of at least 2" of foam
past the end of the pipe in the weapon. You must also have handles on
the weapon. You should not have a quarterstaff entirely covered in pipe
foam, as the foam will break down very quickly in the places where you
hold the weapon. You also need to keep in mind that if this is a lightest
touch sport, you should not be touching the blade of your boffer during
combat. This means that if you continually hit your own arm with your
own butt-spike when you fight, you should be taking damage from those
hits. It's a judgement call, and your group could just as easily decide
that you normally don't take damage from your own weapons unless it
is clearly intentional. The last thing you need to keep in mind about
quarterstaff fighting is that you should avoid the 'whirling dervish'
fighting style that will come naturally when quarterstaves, inexperience
and adrenaline are brought together. It's a really good way to hurt
someone and it's also very difficult to pull your blows when you are
fighting that way. Also, practice a lot before you enter tournaments
and subject partial or total strangers to your 'skill' at quarterstaff
fighting. It's not an easy weapon to learn and fight well with.
Arrows & Archery
As mentioned before, bows must have draw weights of 30 lbs or less
to be used in lightest touch combat. They can be found in toy stores
and in hunting stores, although they often have annoying logos on them.
They are usually fiberglass and come in an assortment of odd colors
(red, green, yellow, etc...). Bows that come in neon or other undesirable
colors can be covered with shelf (contact) paper or duct tape.Before
you go looking for one, call around first to make sure the stores you're
going to actually have them. They shouldn't be too hard to find, but
it might take some looking. Don't try to cover them with foam and try
to use them as parrying weapons in combat, it's just not worth the risk
of someone getting injured.
The arrows used in lightest touch combat are made from golf tubes,
film cannister caps, pipe foam, squishy foam (at least 2"-3"
thick), strapping tape and duct tape. Golf tubes can be found in any
store that carries golfing supplies. They are plastic tubes that are
used in golf bags to organize golf clubs. Film cannister caps can be
obtained by the bagful from any store that develops film. They'll probably
give them to you for free.
The first step in making an arrow is to strapping-tape
a film cannister cap onto the end of the golf tube that does not have
a lip. Next you need to cut and tape a 2" long plug to strapping-tape
to the end of the tube. 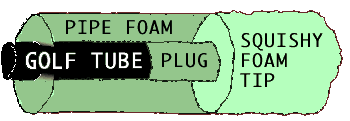 Make sure the plug is as wide around as the film-cannister
cap. This should remind you of how you make a thrusting tip for a sword.
Then you should cut a piece of pipe foam 4" long and split it down
the seam. Put it on the end of the golf tube and cut a 4" long
strip of pipe foam wide enough to fill in the resulting gap in the side
of the thrusting tip. Put strips of strapping tape around the tip and
then securely strapping-tape the tip to the golf tube. Next you should
cut a squishy foam tip at least 2" long and strapping tape it to
the end of the thrusting tip. Be economical with the amount of strapping
tape you use. If you use too much, the arrow won't fly well. At this
point you should be ready to cover it in duct tape and cut holes in
the squishy foam tip.
Make sure the plug is as wide around as the film-cannister
cap. This should remind you of how you make a thrusting tip for a sword.
Then you should cut a piece of pipe foam 4" long and split it down
the seam. Put it on the end of the golf tube and cut a 4" long
strip of pipe foam wide enough to fill in the resulting gap in the side
of the thrusting tip. Put strips of strapping tape around the tip and
then securely strapping-tape the tip to the golf tube. Next you should
cut a squishy foam tip at least 2" long and strapping tape it to
the end of the thrusting tip. Be economical with the amount of strapping
tape you use. If you use too much, the arrow won't fly well. At this
point you should be ready to cover it in duct tape and cut holes in
the squishy foam tip.
The last step is to make the fletching and the nock. The fletching
can be made out of duct tape. Just lay down tape so that it sticks out
in three places forming the equivalent of fletching. Don't put fletching
down in a steep spiral pattern, thinking that it will result in a truer
flight. These arrows fly so slowly that you need as little drag as possible
to make them useful. You can buy fletching if you choose to, but make
sure it's going to be safe to use in lightest touch combat. The nock
is best made out of foam. The reason you need a foam nock is that arrows
will bounce back when they hit things, and if an arrow bounces back
and hits someone in the eye with the nock end they could be seriously
injured. Making a nock is as simple as cutting a cylinder of foam 1.5"
long and about the size of the end of the golf tube, cutting a 1/2"
deep nock into one end, inserting the other end 1/2" into the tube
and strapping taping the the foam to the golf tube. Covering it in duct
tape is a good idea too, as it will last longer that way. At this point,
you should have a finished arrow in front of you. I highly recommend
putting a distinctive mark or color scheme on it so that you will be
able to recognize it easily.
Crossbows
Hand-held crossbows are difficult to make for lightest touch combat
in such a way that they are useful in combat. Usually they are small
and use a rubber-band or elastic cord to shoot their bolts. There are
several things you should keep in mind when constructing a crossbow.
All crossbow bolts should have legal thrusting tips. Crossbows abide
by all standard rules for bows and arrows. In addition, try to find
a way to make sure the bolt won't fall out or move out of firing position
if you have to run around much.
All crossbows and crossbow bolts should be inspected by marshals or
other safety personnel at every event or practice they are brought to.
Because there are no standardized construction guidelines for crossbows,
safety personnel will want to have a look at them before they are used.
You may well develop a safe design for a crossbow and crossbow bolts
that breaks rules designed for bows and arrows. If you do, it's up to
you to convince safety personnel that the weapon is safe. Just remember
that the final call is the marshal's, and that you need to respect their
opinion whether you agree with it or not. They should be able to give
you an explanation if they think your crossbow is unsafe, and may even
have helpful suggestions for a safer version.
Javelins and other Projectiles
Javelins are made out of new lengths of pipe foam. All you do is stick
a squishy foam tip, duct tape and fletching on them. They are cumbersome,
inaccurate, easy to parry and can be picked up and thrown back at you.
They should be treated as one handed weapons and should be between 2'6"
and 3' long. Throwing daggers and other small thrown foam weapons tend
to be too light to notice, too heavey and too much like magic missiles.
If you are using a live-roleplaying system that has offensive magic
spells, you may want to consider disallowing javelins and other thrown
foam weapons. If you can simply throw pipe foam at your opponent, there
will be less reason for players to learn magical offensive spells.
You can use other projectiles in lightest touch combat, such as beanbag
chairs to represent boulders or water balloons to represent flaming
oil. Whatever you want to use, you should make sure that it does not
represent a safety hazard, and it should be throughly combat-tested
before being introduced at a practice or an event.
Magic Missiles
If you are using a live-roleplaying system that has offensive magical
spells, you may have to provide your own props to represent those spells
when you learn them. The traditional prop for magic missile spells is
the beanbag. Beanbags are easy to sew by hand or by machine, and you
will find a wide variety of fabrics to choose from at fabric or craft
stores. If you are using a thin fabric, you may want to double it up
so that the beanbag will be tougher. Most beans will work well for beanbags,
but you might want to avoid rice, lentils and other small beans. Avoid
glass beads and anything else that is hard enough to make the beanbag
dangerous to throw at people. Also, don't pack the beanbags too tightly
or they'll be unsafe for lightest touch combat. Beanbags should be about
1/3 full of beans before being sewn closed. Do not use 'hacky-sacks'
as they are much too tightly packed and are small enough to fit into
someone's eye socket. Rubber balls and nerf balls are also to be avoided
for the same reasons. If you don't want to deal with sewing, you can
simply get a block of squishy foam or pipe foam the size of the tip
of a weapon. When using magic missiles, aim for below the shoulders
and don't throw them harder than you need to. You don't need to toss
them lightly, but don't whip them as hard as you can, either. Use your
best judgement, and practice with them a lot so that you can develop
a good feel for how hard to throw them. Magic missiles can be quite
deadly when in the right hands.
There are other projectiles you can make for your magic system, if
you decide you want more than one type of magical attack. You can sew
a 3' long cone, or tail, of fabric onto your magic missiles and not
allow anyone, even the caster, to touch the beanbag part of the missile.
The danger of this type of missile is that it is easier to throw it
hard, and when throwing it underhand it is easier to accidentally hit
your opponent in the groin. Because the are much harder to control than
regular beanbags, you should practice with them thoroughly before using
them in combat. Another kind of missile you can make is the fabric frisbee.
It is a circle of fabric about 6" across with beans or other safe
weights sewn into the edges. They can also be purchased at toy stores.
There is a danger to creating a variety of magical attacks for spellcasters
to use. If you have only one attack spell which inflicts damage like
a sword blow does, it is extremely easy for new participants to pick
up the combat system. The more new people have to learn about how magic
works in combat, the more often you will have to stop in the middle
of combat and explain spell effects to people. In addition, if there
is a large battle with several spellcasters fighting at once, casting
different attack spells, people won't always know what hit them. Having
to stop combat to decide if someone was hit by a magic missile, a fireball
or a sleep spell could be a regular occurrence. Some people don't mind
stopping to explain things in the middle of combat, but for others it
can be extremely frustrating. This is entirely a matter of personal
taste. This system is meant to provide a very fluid, combat-intensive
game, and therefore I would personally recommend only providing one
offensive magic spell, which inflicts damage as a sword blow would.
Unsafe Boffer Designs
There are several classes of weapons that are not recommended for use
in lightest touch combat. The ultimate decision on whether a weapon
can be used at a practice or event should be made by the Head Marshal.
I strongly advise against allowing individuals to fight with weapons
that are generally considered unsafe if they demonstrate that they can
fight safely with them. Someone is bound to pick up the unsafe weapon
and hurt someone with it. In general, it's simply fairer to not make
exceptions for certain individuals. The weaponry that has traditionally
been banned are punch daggers and morning stars, or flails.
Punch Daggers
Punch daggers are defined as weapons which are constructed with a blade
attached at a 90 degree angle to the handle of the weapon. If in order
to perform a thrusting attack, your hand would move towards your opponent
as if you were punching them, the weapon you are using is a punch dagger.
By contrast, if you moved your right hand towards your opponent as if
you were punching them and you were holding a normal weapon, its point
would be pointing to the left. If you were to accidentally hit someone
too hard when thrusting with a normal weapon, the looseness of your
grip and the flexibility in your wrist would help to cushion the blow.
When your hand is in a punching position, your grip is generally not
as loose and your wrist will not be prone to flex at all under direct
pressure. There are people who are trained or coordinated enough to
be able to use a punch dagger in lightest touch combat, but it is far
safer to disallow them than to find out that someone is unsafe with
one when they seriously injure an opponent.
Morning Stars & Flails
Morning stars and flails are weapons that have a striking surface attached
by a rope or other flexible material to a handle. In lightest touch
combat, we emphasize that you should pull your blows at the surface
of your opponent's skin so that you hit them as lightly as possible.
In order to pull your blow, you need to have total control over the
striking surface of your weapon. That is why weapons that are too whippy
are judged unsafe. As far as I can tell, it is impossible to have total
control over the striking surface of a morning star or flail. In addition,
if they were used, some overzealous fighter would manage to wrap the
rope from their morning star around their opponent's wrist, pull real
hard, and you would have an injury on your hands. I can agree that they
may sound like fun, but I cannot recommend trying to make or fight with
morning stars or flails for safety reasons.
Shield Construction
There are three basic safety requirements for constructing a shield.
Firstly, it must have blade foam (the same pipe foam you use on your
swords) on all of its edges. Secondly, it may not have anything protruding
from its face that could injure an opponent or damage the foam of a
sword. Lastly, you should never have any part of your shield designed
to be used as a weapon.
All shields need straps or handles which enable it to be held on the
shieldman's arm during combat. There are two materials I can recommend
for making a shield. The first is a circular plastic sled. They make
for a nice, curved, round shield and they're very light. The second
is 1/4" thick plywood. It can be cut into a wide variety of shapes
and is also quite light. For straps, old belts work well. You can use
two straps or a strap and a handle, if you want. Handles can be bulky
and difficult to attach and are more expensive than straps. However,
you may find that a handle will give you greater control over your shield
than a strap will. You should make sure that when you cut your straps,
the forearm strap is long enough that you will be able to drop the shield
easily. This is important, as you will need to switch your sword to
your other hand if you get hit in your sword arm. Be careful not to
throw the shield when you do this. To attach straps, pop rivets coupled
with large washers do a good job. You may want to use bolts and wing
nuts or standard nuts if you want to paint both sides and make it reversible
(one side with your symbol and the other black for NPCing). If you use
straps, make sure the strap is attached in such a way that you will
not scrape the back of your hand on the rivets or bolts you used.
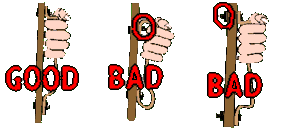
When painting a shield, don't use spray paint. The result will look
better if you use a brush. You may instead choose to make a fabric cover
to put on the shield face before you attach the pipe foam onto the edges.
The pipe foam on the edges should be covered in duct tape to protect
it. You can attach it to the shield by taping it tightly and also duct-taping
it to the back of the shield in several places. You can also drill holes
around the edge of the shield and lace the foam edge onto the shield.
Lacing takes more work, but looks nicer. Bucklers (small shields that
strap to your sword arm) should not be allowed. If you are holding a
shield, you must hold your weapon in your other hand if you are going
to be in combat.
Armor Construction
Armor in lightest touch combat is used to absorb blows from your opponents.
Light, flexible armor counters one blow per section of armor and heavy,
rigid armor counters two blows per section of armor. Armor is divided
into the following sections: head, front, back, left arm, right arm,
left leg, right leg. Armor should be constructed to look like medieval
armor. It must also follow two safety guidelines. It must not have any
protrusions that could cause an injury to another participant or damage
another participant's weapon. It must be light enough to allow the wearer
to feel blows through it. Armor comes in many shapes and sizes. To protect
your head, there are helmets and chain mail coifs. To protect your fore-arms,
you can make arm-guards. To protect your body, you can make a wide variety
of suits of armor. I highly recommend doing research before you decide
what you want to make, as there are too many styles and types of armor
to list here. Certain gaming systems might have variations in their
armor rules, so you should be sure to find out how armor is treated
if you start playing in a new system. Armor should be presented for
inspection along with your weapons at every weapon inspection. There
are several materials armor is made out of: quilted fabric, leather,
chain links and plastic or metal plates.
Quilted Armor
Quilted armor is constructed out of quilted fabric, which can be purchased
at most fabric stores. In medieval times, quilting was worn underneath
armor. It was used as armor by those who did not have a suit of armor.
It was not as protective, but was better than nothing. Quilting is generally
rated as light armor.
Leather Armor
To make leather armor, you need leather, a hammer, a hole punch (or
awl) and quick one-hit rivets. You may also want to get buckles, welded
brass or steel rings, studs, lacing and leather stamps. Finding supplies
can be difficult. There are mail-order companies that sell leather-working
supplies, and some leather goods stores that make their own merchandise
also sell tools and leather. Leather comes in a variety of thicknesses
and can be dyed in a variety of colors. You can also purchase both dyed
leather and undyed leather. The most important thing to know about working
with leather is that you should do a lot of planning and sketching before
you start cutting your pieces. You should also be willing to search
for people who have experience working with leather, so you can get
your many questions answered. Leather is expensive enough that you don't
want to make mistakes and waste your materials. Stores that make their
own leather goods will probably sell scraps for a fairly low price.
You'll get a variety of weights and colors of leather and you will be
challenged to create a pattern that will work with the many sizes of
pieces you'll have to work with. One good tip is to work on graph paper
and make 1:1 scale paper patterns out of brown paper bags. If the pattern
works, you should save it for future use. If you put enough thought
into what you're doing, you should be able to make a minimum of mistakes
and produce decent armor without too much practice. Leather is often
rated as light armor. However, if your leather armor has metal rings
or plates attached, it may qualify as heavy armor, if there are enough
of them.
Chain Mail Armor
Chain mail is probably the most tedious form of armor to make. To make
the links, you need 16 or 14 gauge electric fence wire (1/4 mile will
make several coifs), a 3/8" diameter steel rod, an electric drill,
a good pair of wire cutters (with a lifetime guarantee), two pliers
and lots of free time. Using a drill bit that is slightly larger than
the wire, drill a hole through the steel rod 2" from the end. Then
put the tip of the steel rod that has the hole in it into the drill
(as if it were a drill bit). Stick the end of the wire into the hole
in the rod, bend it over and use the drill to wrap the wire around the
steel rod. Go slowly, trying to keep from overlapping at all. When you
have covered the rod with wire, carefully remove it from the drill.
Use the wire cutters to cut the wire you threaded through the rod and
you will be able to slide the spring off of the rod. At this point,
if you want to, you can start cutting links off of the spring. That's
how you make links. There are places where you can buy pre-cut links.
If you're interested, ask your local hardware store or gaming shop and
they should be able to hunt some down for you.
Making the wire links into chain mail is another matter entirely. First,
you should take a handful of links and close them. Put them into one
pile, and make a second pile of open links. You may want to use bowls
to organize and store them. First you need to make a chain of links,
alternating one link with two-links. When you have a strip of chain
mail as long as you need for whatever project you are doing, lay it
down and spread out the sets of two links so that they slant in the
same direction. Then take an open link, put two closed links on it and
attach it to two of the links that stick down from the chain. Then take
an open link, put one closed link on it and hook two of the links that
stick down from the chain and one of the closed links that you just
attached in the previous step. Continue until you have reached the end
of the chain. This is called 'catching four', because each time you
put an open link down, you catch four closed links. There is also a
way of 'catching six' that will yield a thicker chain mail. The most
difficult thing about making chain mail is the time it takes.
Making chain mail coifs is more difficult than making uniform sheets
of chain mail. Start by attaching six closed links onto one open link,
and close the open link. Then attach an open link onto two of the closed
links. Attach an open link onto one of the closed links you just used.
Then attach an open link onto both the link you just put the previous
link through and the link next to it. Continue around until you have
attached a total of twelve links onto the previous circle of six links.
On the next circle, just go around hooking two links each time, putting
a total of twelve links down. On the next circle, expand the number
of links in the pattern again (the same way you did before) so that
you have attached twenty-four links this time around. For the next three
circles of links you attack, just go around catching two links each
time. Then you will do another circle where you expand the number of
links so that you attach forty-eight links this time around. From this
point on, go around catching two links each time. You will probably
need to attach fifteen rows before the edge will be at eyebrow level.
You should try it on every so often to make sure it's coming out correctly.
From this point, you should attach rows long enough to go around the
back of your head. Eighteen more rows should bring it down far enough
to cover the back of your neck. Experiment with it and customize it
as much as you want to. You can either make the chain mail connect across
the front of your face, or you can put a strap, lace or hood to attach
it under your chin. A coif that isn't the right size or that isn't strapped
under your chin correctly may tend to fall over your eyes or off your
head easily. If you have long hair, you might consider making a fabric
coif or headwrap to wear under the chain mail coif so that you have
a minimum of discomfort when taking it off after a long day of fighting.
Plate Mail Armor
Plate mail is singularly difficult to make because of the trouble finding
good materials to make it out of. Cut up milk bottles just don't cut
it - even if you put duct tape all over them. It is very difficult to
make it look anything but cheesy. However, certain plastics or light
metals can be worked with to make quality plate mail. When making plate
mail, you need to consider several things. You need to be able to get
out of it quickly in the event of an emergency or injury. You don't
want it to have any sharp edges if you can possibly avoid it. Dependent
upon what it is made out of, it may be very noisy. It may reduce your
flexibility and speed considerably. The more plates it has and the more
carefully it is constructed, the better it will be able to move with
you. Again, for ideas I strongly encourage you to do research. When
making patterns, you would also do well to cut paper patterns before
actually working on your materials, just to make sure you don't waste
materials. You'll probably need a drill and something to cut your material
with, but tools are mostly dependent upon what you are going to work
with. Let me leave you with one note about trying to articulate your
armor. Articulation is made possible by having two plates attached by
a rivet that is slightly loose. The rivet passes through a hole in one
of the plates and a slot in the other, enabling the other plate to slide
slightly. That probably won't help much, but good luck anyway!
Weapon Maintenance
Storage
Light weapons should be stored carefully. If they are rested against
anything that has a bump or a ridge, they will develop indentations.
They are best stored either laying down on a flat surface or standing
on their pommels against a wall. Also, if they get hot, they will tend
to indent easier. For that reason, you shouldn't leave them in the trunk
of your car all summer long. They might survive, but it's better to
just bring them indoors. If they get wet, they will hold the water and
get heavier. You should try to let them dry out completely before using
them if they do get soaked. Lastly, do not store them standing on their
tips. Don't even lean on them with the point down. The tip of your weapon
will probably be the first part to break down, and the more pressure
you put on it, the less it will last.
Weapon Breakdown & Repair
Light weapons get damaged in a wide variety of ways. They get dents,
tears and soft spots. Prolonged exposure to cold and to water can also
damage the foam of your weapons. If you ever think it's time to repair
your weapon, stop using it until you have time to repair it. Most weapons
develop soft spots at their tips before they develop any other problems.
If you try to just replace the tip by cutting the foam slightly below
the tip, you will be giving it another weak spot where it will break
down quickly. If you try to just put extra tape around the area where
the foam has broken down, the problem won't be solved. There will just
be a spot on your weapon where it is harder than most foam is. In addition,
if you put extra coats of duct tape around the tip, it will make it
too firm, and it won't compact or flex in the event of a hard thrust.
Generally, the best policy is to just replace the blade. Always re-use
squishy foam tips unless there is something seriously wrong with it.
Squishy foam rarely breaks down. When removing an old blade, cut it
several inches above the bottom of the blade. If you find yourself wearing
down swords really quickly, you might be hitting too hard. If you have
no extra pipe foam, and have no money to buy more pipe foam, and the
problem with your sword is that the tip is getting soft, then you can
flip the blade. Flipping the blade means that you cut the blade off
near the base of the blade and then re-attach it upside down. When you
do this, the soft foam is now near the handle, and much less likely
to be used in combat. You may need to put in a 1/2" ring of foam
as a spacer to compensate for the fact that the blade has compacted
over time. You can tell whether or not you need to do this by comparing
the length of the pipe and plug with the length of the pipe foam.
Training & Tactics
When training someone new, there are many things you need to do. The
first is to give them a copy of the rules that you are fighting by,
so that they can take them home after the practice or event and memorize
them. You should also tell them all the rules - some people remember
things they hear better than things they read. Once you have told them
the rules, I recommend trying to teach them the following things, in
order: how to stand, how to parry, how to attack.
When fighting someone new, one will get an idea of how good they are
by how they stand, before they even strike a blow. A good stance is
very important to fighting well, although I have seen a variety of unorthodox
styles do well for certain individuals. I recommend a fencer's stance.
If a fighter is right handed, their right foot should be forwards, pointing
at their opponent, and their left foot should be behind them, pointing
to the left. Their feet should be at least as far apart as their shoulders
are wide, and their knees should be at least a little bent. Their shoulders
should be 'back', directly over their hips. If they are fighting with
one weapon, their shoulders should not be square to their opponent.
Their elbow(s) should always be behind their hands (not sticking out
to the sides). They should grip their weapon loosely, but strongly,
so that they will be able to use the flexibility and suppleness in their
hands and wrists to their advantage when fighting, but their weapon
won't be knocked out of their hands easily. Even when lunging, they
should keep their shoulders over their hips. If they are leaning forward,
they will be much more prone to a head-bop and they will have a harder
time parrying a blow if they don't succeed in killing their opponent.
They will also do well to hold their sword up in front of them, rather
than to either side, or down. It is important for them to learn to return
to their on-guard position (with their sword up and centered) after
every parry and every attack. If they allow their sword to float out
of position, they may be opening themselves up for an easy attack by
their opponent.
Once your trainee has an idea of how to stand, you should work on their
parries. Before you bother trying to teach them how to hit their opponent,
you need to make sure they'll stay alive long enough to be able to try.
When they parry, they should keep their elbow in by their side. They
also need to keep their parries in close to their body. If they over-parry,
they will be easy prey for anyone who knows how to feint. A feint is
a feigned attack that causes an opponent to parry, enabling the fighter
to attack where the opponent's sword had just been. When parrying, it
is a good idea to try to keep the tip of your sword in close to or above
your head. This will help you to protect your head, and it will make
it easier to recover from an opponent's feint. Practice having them
parry your attacks, slowly at first so they learn the form of the motions
they are practicing. Work on having them parry attacks to their arms
first, and then work on parrying their head. Once they have a good understanding
of this, you need to teach them how to defend their legs. In a standard
fighting stance, they will have one leg closer to their opponent. This
leg is quite easy to hit, especially if you throw a feint at their arm,
causing them to parry to the side. After testing them to see what their
natural reflexes are, teach them to pull their leg back out of the way
when they see a leg swipe coming. If they seem to pick this up fairly
well, try to get them to swing at the arm their opponent is using to
attack their leg. They may even be good enough for you to teach them
to go for a head-bop as a counter to the leg swipe, but this has a lot
to do with how tall they are and how long their arms are. Once you have
taught them how to defend against attacks to their legs, you should
have them practice parrying your attacks for a while, until you think
they have a good feel for defense.
At this point, you should move on to attacks. They will probably be
more than ready. I recommend teaching them how to attack their opponent's
arms first. Have them work on your arms, slowly increasing your parries
as they improve. This is the best time to judge whether they are going
to have a problem with hitting too hard. If they do, you need to make
sure they aren't holding the sword too tightly, and you need to make
sure that they understand that they should be trying to hit the surface
of your skin as lightly as possible. This can be difficult to teach,
and that is why you are starting with arm-hits rather than lunges to
the stomach or head-bops. You can have them practice striking with a
downward cutting motion, a sideways slashing motion or a thrusting motion.
The motion that feels most comfortable to them is the one to have them
work on. Have them practice targeting the inside and outside of each
of your arms until they have a good idea of what they are doing. At
this point, if you feel they are ready, you can have them work on thrusts
to the torso. You need to make sure they know that if they thrust too
high up, the sword tip may run up their opponent's sternum and into
their throat. It is far safer to thrust to the stomach than to the chest
area, especially because there are many women participating in this
sport who don't appreciate getting hit in the breasts. If they seem
to be safe doing this, you can start teaching them how to do feints.
Demonstrate some to them, and then teach them the ones you know. Most
attacks are only a fraction as effective as they are when preceded by
a good feint. The only other thing that is as useful as knowing how
to feint well is having good speed. If you can hit your opponent before
they can parry your blow, you're doing well. The trick is that you need
to be able to swing very quickly, but hit very lightly.
There are some feints I can recommend trying.
One thing you should know about all feints is that if your sword contacts
your opponent's hand or sword, it will disrupt your motion, and your
feint will probably be unsuccessful. Feints must also be close enough
to your opponent to convince them that they are actually attacks. With
that in mind, here are a few ideas to try.
- A downwards feint by the outside of your opponent's hand will make
them parry out. If they don't contact your sword, you can continue
your swing down and inside, hitting their leg.
- A downwards feint by the outside of your opponent's sword-hand,
making them parry out, can also precede a quick circle under their
hand, enabling you to either hit the inside of their arm, or their
torso (if your reach is long enough). This is called a disengage in
fencing.
- A thrust to the outside of your opponent's sword-hand will cause
them to parry out. If you pull the tip of your sword back as they
are parrying, you can then thrust in and hit the inside of their arm.
- A feint to the outside of your opponent's sword-hand will cause
them to parry out. If you then wait for them to pull their sword back
to an on-guard position, you may be able to hit the outside of that
arm.
- A quick succession of feints, first to the chest and then to the
legs may cause your opponent to follow your sword with theirs. If
they do, they may leave their head and shoulders open.
- A thrust to the area to the right of your opponent's head will cause
them to parry up and to their left. If you follow this with a quick
swing around and to their right side (which should be exposed) you
can score a quick kill.
One of the most deadly attacks in lightest touch combat is called the
head-bop. When done correctly, it is extremely fast and difficult to
parry, and will land lightly on the top of your opponent's head. However,
when done incorrectly, it can easily result in a face-shot. I do not
recommend training new people to hit their opponents on the top of the
head. Only if they are particularly gifted and hit extremely lightly
would I attempt to show someone new to the sport how to throw a head-bop.
At any rate, I recommend practicing head-bops a lot before you start
to use them as a regular attack.
Drills and Exercises
To excel at any sport requires a certain amount of practice and training.
Light Weapons Combat is no different. There are a number of drills and
exercises that you can do that will help your fighting ability. Stretching
regularly is important, and just generally keeping in shape isn't a
bad idea either. You will find yourself using muscles in lightest touch
combat (most notably, your forearm) that you don't use too often.
One good exercise to work on your point fighting is to hold a sword
out at arm's length, pointing at an imaginary opponent. Then, make a
quick, small circle with the point of the sword (starting at the top
of the circle). Then, make another one, going in the opposite direction.
Keep doing this until you start to feel a warm, burning in your arm.
Switch arms. This is the motion you will do when you do a disengage.
Another way to strengthen your arms is to close your hand into as tight
a fist as you can make. Then bend your wrist back and forth as far as
you can, holding it for several seconds in each direction.
Getting a racquetball or therapy putty, and carrying it around squeezing
it a lot will work your forearms well. Milking a cow by hand is another
really good way to develop strong forearms (if you have a dairy cow
around, of course). Make sure you keep your flexibility, though.
Hanging a tire (or two tires, one inside of the other) with a rope
from a tree branch, and hitting it with a baseball bat is an excellent
way to strengthen your arms. Wearing a helmet and kneepads is a good
idea when doing this, as you will accidentally hit yourself with the
bat at least a few times before you get the hang of it. Be careful to
retain the ability to 'pull' your blows, though. You don't want to get
into the habit of hitting things hard, and then wind up hurting someone
while doing lightest touch combat.
You can also practice by hitting (lightest touch!) a tree or post or
wall. Aim for a particular target spot with each hit and practice feint-attack
combinations. This will train your muscles to execute combat movements
naturally.
Clothing and Protective Gear
In lightest touch combat, and at live-action roleplaying events, you
want to wear loose, comfortable clothing that you can fight in. You
should avoid clothing that is highly padded, as it may interfere with
your ability to tell if you were hit. You should also avoid clothing
that is long and flowing and might catch a weapon accidentally.
You probably won't need much protective gear as
long as you and your opponents are fighting safely. Glasses can break
quite easily, and I do recommend using sport goggles or wearing contact
lenses when fighting. I also highly recommend buying and wearing kneepads.
Whether out in the woods or practicing indoors, dropping to your knees
in the middle of a fight can be very painful, especially on a rock,
tree root or a hard tile floor. The kind of kneepads made for in-line
skaters work very well. They have a plastic plate on the knee and are
well padded. When you're wandering around in the woods on your knees,
you want kneepads that will survive lots of scrapes. Padded fabric kneepads
will work, and are much cheaper, but they don't offer as much protection.
If you are young, it may not seem like a big deal, but you really don't
want to develop bad knees. There are many adults who were once very
athletic, but who cannot participate in many of the sports they enjoyed
in their youth due to knee injuries. Ask around.
If you have ever had a serious head or back injury, you might want
to consult your physician before taking up lightest touch combat. Wearing
a protective helmet is an option for people who have had head injuries,
and you can also ask the people you are playing with to not hit you
in the head for medical reasons. If they are your friends, they should
be happy to accommodate you.
Tactics and Strategies
Before long, you will find that fighting in a large group against another
large group can be a lot of fun. However, group combat is much more
complicated than simple one on one combat. Often, if the sides are evenly
matched, the team that has the best tactics will emerge the victor.
Here are some basic ideas to help you as you learn to fight in large
groups.
- When you are fighting alone against two or more opponents, you want
to do what has been known as "dotting the i" This means
that if your opponents are in a line, you want to be at the head of
that line, so that you only have to fight one of them at a time. If
your opponents are the line, you will be the dot at the end of the
line that will make it look like the letter "i".
- When you are fighting in a group against a single opponent, you
want to do what has been known as "crossing the T". This
means that if you were to draw a line from your single opponent to
the center of your line, it would form the letter "T". This
is more difficult to do than "dotting the i" because your
entire team has to be coordinated. If the individual you are fighting
runs towards the left side of your line, they must back up, and the
right side of your line must swing forwards so that the individual
is no closer to the left side than they are to the right side.
- When fighting in a line, you need to keep in mind that you are not
fighting the person opposite you, but every opponent within weapon's
reach. This means that you need to be aware of attacks from the person
in front of you and all of their neighbors, so to speak. You should
also be prepared to attack not only the person in front of you, but
the people in front of your own neighbors as well. You also need to
keep tabs on any enemy archers within range of you. One-on-one sparring
develops the habit of focussing on only the person in front of you,
and it takes an equal amount of practice to learn to focus on fighting
a larger number of people.
- When fighting in a line, it can be good to have all of your shieldmen
in the center of the line. Then, if you have pole-arms or great swords,
place them in between the shieldmen. The shields and the long weapons
interspersed work well to fend off attackers. You just have to make
sure no one gets behind your line.
- When fighting a team that has archers, you will do well to send
some shieldmen after them. While archers can be deadly in group combats,
it is very difficult for an archer to do anything effective against
a good shieldman.
- When you are fighting a single opponent who is better than you are,
and the only ones left alive from your team are you and a teammate
who has lost his/her legs, you should stay by them, rather than being
lured away to fight your opponent one on one.
- If, in a line battle, you manage to break through your opponents'
line, you have two options. You can go down the line hitting each
opponent in the back as quickly and quietly as you can. If you don't
like to backstab people, you can instead make a lot of noise, so that
they realize they have been flanked and then have to decide whether
to ignore you and keep fighting or turn around.
Marshalling
Types of Marshals
Marshals are the referees of lightest touch combat. They are chosen
by eventholders and are there to help keep anyone from getting hurt.
While everyone should be able to perform as a marshal, you are only
a marshal if the eventholder of the event you are at has specifically
asked you to be one. In a similar vein, at a practice, the person in
charge will usually appoint marshals. As there are many jobs marshals
can perform, there are several types of marshals.
- Trainers
- Trainers teach new people how to play the sport, and re-train experienced
fighters who are having trouble with the rules.
- Tournament Marshals
- Tournament marshals help eventholders by running tournaments for
them.
- Magic Marshals
- Magic marshals help to keep all magic users in live-action roleplaying
games from breaking the magic rules.
- Field Marshals
- Field marshals play and fight as either player characters or non-player
characters, but are also responsible for resolving conflicts and rules
disputes and making sure everyone fights safely.
- Head Marshals
- Head marshals are responsible for helping eventholders run their
event, contacting and organizing other marshals and overseeing the
marshalling of the event. Head marshals are often asked to contribute
by designing and scheduling tournaments.
Running Tournaments
Running tournaments is a difficult thing to master. There are three
ways to run a tourney; single elimination, double elimination, list
style and attack/defense. Each has advantages and disadvantages. If
there are lots of people entered, you should run the tourney single
elimination. If there aren't as many, you can run it, double elimination,
list style or attack defense. For running tournaments, I recommend using
index cards for single and double eliminations. Don't bother having
a sign up list. Just give people an idea of when the tourney is going
to run and then call together everyone who is interested when you're
ready to run it. Write the name of each entrant on an index card, shuffle
them and you're ready to roll. You might want to write down the group
each entrant is from, if possible, so that you can keep from having
people from the same group fight each other in the first round. They
probably practice together regularly and go to events to fight people
from other groups. For list style and attack/defense tournaments it
is easier to have a sign-up list to work from.
Running a single elimination tournament is easy.
Fight the first two people, and drop the one that loses. If you're using
index cards, place the winner at the back of the stack of cards. You
can cross-hatch them to differentiate between the current round and
the next round. If there is an 'odd man out' at the end of the round,
have them fight the first participant in the next round (which should
be the index card right underneath their index card). Don't feel that
you have to explain how you run a tournament to a participant. If someone
who lost complains that the winner had to fight one less bout than anyone
else, that person still lost a fight, and the winner didn't lose any,
so there shouldn't be any complaints. Be sure to keep track of honor/dishonor
(i.e. going by or breaking the rules) and talk to participants who are
having problems.
Double elimination tourneys are harder to run.
You need to mark or designate the entrants who lost bouts and remember
to remove them from the list of participants when they get their second
loss. Using index cards, go through the stack, fighting each pair. Put
the winners at the back of the stack, sticking out to the left. Put
the people who lose at the back of the stack, but in front of the winners,
sticking out away from your palm. Always put each loser or winner at
the back of their section, unless they have lost twice, in which case
they should be dropped. When you have gone through the stack, mark the
cards that have lost once with a pen, or by ripping off the corner of
their index cards. Then fight the next round, throwing out cards that
lose a second time, putting cards with one loss in the one loss section
and cards that are undefeated in the winners section. Eventually you
should be able to boil it down to one winner. Practice running these
double elimination tournaments before you ever have to run one at an
event, as they can be confusing.
Running tournaments in the list style is simple,
and will enable everyone entered in the tournament to fight everyone
else once. Go through the list and have each participant fight everyone
above them on the list. This means you fight #2 vs. #1, #3 vs. #2, #3
vs. #1, #4 vs. #3, #4 vs. #2, #4 vs. #1, etc... The last person to have
signed up will have to fight everyone else in a row, so make sure they
have time to catch their breath between bouts. Award a point for each
win and a half point for each simultaneous kill. Keep track of honorable
and dishonorable conduct. If at the end of the tournament there are
one or more people within a few points of the winner, you may want to
take honor/dishonor points into account. Don't inform participants of
their point totals. When each entrant has fought against all the other
entrants, the tournament is over.
Running a tournament in the attack/defense style
is fairly easy, and it lets all the participants fight a lot, not just
the ones who win a lot. Each participant will take a turn defending
against each of the other participants in turn (not all at once). This
means that every participant will fight every other participant twice
- once while 'attacking' and once while 'defending'. For every win that
the defender gets, they are given one point. Defenders get no points
for losses. For every simultaneous kill, the defender is given a half
point. You may choose to have simul-kills fought over again, or to not
award the defender any points at all. Make sure that participants understand
that when 'defending' they do need to kill their opponents. Keep track
of honorable and dishonorable conduct. If at the end of the tournament
there are one or more people within a few points of the winner, you
may want to take honor/dishonor points into account. Don't inform participants
of their point totals. When each entrant has defended against all the
other entrants, the tournament is over.
Types of Tournaments
There is a wide variety of tournaments you can run in lightest touch
combat. One man, one woman and one person tourneys in which participants
can use any weapons are very popular. You can also run axe, sword &
shield, dagger, pole arm, dicky weapon of doom and archery tourneys.
The bottom line is that you need to make sure there's enough tourneys
for everyone who has attended your event or practice, and that they
are fairly run. I would recommend not having participants be able to
use armor in most tourneys. You can have special tournaments in which
armor counts, but you will find that the majority of players don't have
armor, and will resent the advantage older, armored fighters will have.
One kind of individual tourney that does not
rely on rounds is the grand melee. In a grand melee, everyone participating
goes out into the field or arena, and after a lay on is called, the
last one alive is the winner. I can recommend one interesting variation
on the grand melee, called the grand melee from hell. The grand melee
from hell is a succession of grand melees, in which everyone who has
won once is given a brightly colored tassel or sash and forced to start
in the middle of the area you are using. To win the grand melee, you
must win two of the grand melees. I recommend making it very clear who
has won one grand melee, so that those people have their work cut out
for them. Grand melees from hell can be a lot of fun, and last for hours
if you have a large group.
Gauntlets are also popular tournaments to run.
You need some object for people to try to retrieve and people to play
monsters who try to kill the people running through the gauntlet. You
should make the monsters progressively more difficult, and the more
you make your gauntlet-runners think, the better. Most of the gauntlet
should be out of sight from the entrance so that participants won't
know what they're going to encounter. You should also make sure to tell
people not to reveal what they saw inside the gauntlet until the tournament
is over. Gauntlets are best run all day long, while other tournaments
are going on. You may want to time the gauntlet to determine the fastest
entrant, and to give the participants a reason to not take too long.
Group tournaments are also popular. You can
have tourneys for specific-sized teams, like a seven person team tourney,
or a couples tourney. You can also make group tourneys interesting by
giving the teams a bridge to fight over. You can also play capture the
flag, with a resurrection point participants can go to if they get killed.
Standard rules for capture the flag are that you cannot move your own
flag and you must touch your opponent's flag to your own in order to
win. A one hundred count for the resurrection point works well, and
it's long enough that you don't need to worry about people counting
too quickly. You can also use a clock or an egg timer to pace your resurrection
point.
Group tournaments can get much more complicated
than a simple capture the flag game. Blood Bowl is a game I developed
in 1992. I developed it with the intent of giving players who played
mages and healers more to do at tournament events. You need two circles
of rope or hula hoops, to be used as goals and placed at opposite sides
of a field, and at least two magic missiles (beanbags) to play. Mages
can throw the magic missiles, and healers can touch the ground inside
their goal with their hands and then go raise fallen teammates. The
healers can carry one 'raise' in each hand. The object is to throw your
magic missile and hit the ground inside your opponent's goal. The goals
cannot be moved. Teams start play around their own goal, and each team
should start out with at least one magic missile.
Look in a future edition of A Complete Introduction to Boffers for
rules on how to play Live Chess. It was developed and tried at Queen
of Hearts III (the annual tournament event my wife and I hold).
Other Marshalling Duties
Marshals are often the individuals who call HOLDs and LAY ONs. Marshals
are also the only people who are allowed to move during a HOLD. It is
their job to make sure anyone hurt is taken care of, so they need to
be able to assess any potential injuries as quickly as possible. As
a marshal, it is also your job to make sure other people aren't moving
or looking around needlessly during a HOLD.
Before every event and practice, it is a good
idea to read the rules listed in
the beginning of this publication. As a Marshal, you should try to make
sure that the rules do get read, out loud, to everyone at the event.
It is traditional to pass around the rules, so that a number of people
get a chance to read them aloud. If you are doing a weapons inspection,
it is usually a good idea to do it right after the reading of the rules,
as you will have everyone's attention. When inspecting other people's
weapons, make sure you explain to them what is wrong with a weapon,
and how they can repair it, if you ever have to fail someone's weapon.
Sometimes you will be asked to put inspection tape on weapons that pass,
as a way of marking the safe weapons on site. If you are using inspection
tape, you need to keep an eye out for people fighting with unmarked
weapons during the event.
As a marshal, you may want to inspect the site you
are using for your event or practice. When inspecting a site, you need
to look for hazards that might cause injuries to the players during
the event, and especially during the night if it is a two-day event.
If your site is on farmland, look for old barbed wire. Look for wasp
and hornet nests during the summer. Use your common sense, and don't
be shy about requesting that part of the site be off-limits for safety
reasons, if you think that it needs to be. It is an extremely good idea
to have people trained in CPR and First Aid on-site at all times. Also
have available a first aid kit and a phone and/or car for emergency
room access. Have and emergency communication system in place so that
a group out in the woods can summon help with a walkie-talkie, by blowing
a whistle or yelling "Medic!".
Keep an eye out for people becoming angry or overheated. Problems can
be prevented by early intervention. Talk with the angry person and listen
to their gripes. Being listened to calms people down and they may have
a legitimate complaint. Tell an overheating person to rest and get some
water - you may find it wise to announce a "water break" for
the entire group, especially if people are starting to hit harder and
ignore blows.
You may need to speak with or re-train individuals who are having trouble
with the rules. Pull them aside to speak with them privately - you'll
get a better response than if you were to challenge them in front of
their peers. Be firm and blunt with them about the problems people think
they are having. Often, you need to be very direct with them before
they will admit that they are having a problem. This isn't always the
case, but often it is. It is very difficult telling someone that other
people think they are cheating, and it is more difficult to confront
them if they have been 'winning' in tournaments. However, the more direct
(and fair) you are and the more you respect the people you're marshalling
for, the more respect you will win from them, and the more they will
listen to you when you need them to.
It is a good idea for marshals to have tabards to make them easily
identifiable. A common tabard design for marshals is a square white
tabard with a red stripe going from the top left corner to the bottom
right corner. If you are making tabards, you might want to make pouches
as well. Pouches will help you keep from losing index cards and pens
that you will use when running tournaments.
